
If you want to learn how to make a $10 DIY compost bin for your garden, you don’t need fancy gear, power tools you don’t own, or a trip to a specialty store. With a few scavenged items and a short list of cheap supplies, you can build a compact, tidy bin that turns kitchen scraps and yard waste into rich compost in weeks to months—saving money on soil amendments and keeping organic waste out of landfills. This guide shows you multiple build options, the exact steps to assemble and use them, and how to maintain fast, odor-free compost.
If you garden in a dry climate or want to keep your pile perfectly moist without relying on hoses, a simple water buffer helps. A practical option is storing clean water for compost and irrigation with SmartWaterBox, so your bin never dries out between rains.
Table of Contents
Table of Contents
Tools and materials to make a $10 DIY compost bin
You have several paths to a $10 build. Choose the design that matches the materials you can source cheaply or for free.
Low-cost sources to keep your build under $10
- Local “Buy Nothing” groups or curbside: cracked storage totes, old trash cans, pallets
- Bakeries or restaurants: free food-grade 5-gallon buckets with lids
- Coffee roasters: burlap sacks to line or cover bins
- Construction sites or neighbors: leftover hardware cloth, zip ties
- Hardware store clearance bins: bungee cords, clamps, surplus plastic mesh
Option A: Lidded tote bin (the classic apartment or patio choice)
- 1 large plastic storage tote with lid (18–30 gallons; scuffed or used is fine)
- Drill with 1/4-inch bit (borrow if you can)
- Optional: bricks, blocks, or scrap wood to elevate the bin
- Optional: small scrap of plastic mesh or window screen to cover holes internally
Option B: Wire cylinder bin (ultra-cheap, high airflow)
- 8–10 feet of rigid plastic garden mesh or hardware cloth (2–3 feet tall)
- Hand cutters or tin snips
- 6–8 zip ties or short pieces of wire
- Optional: stakes or tent pegs for stability
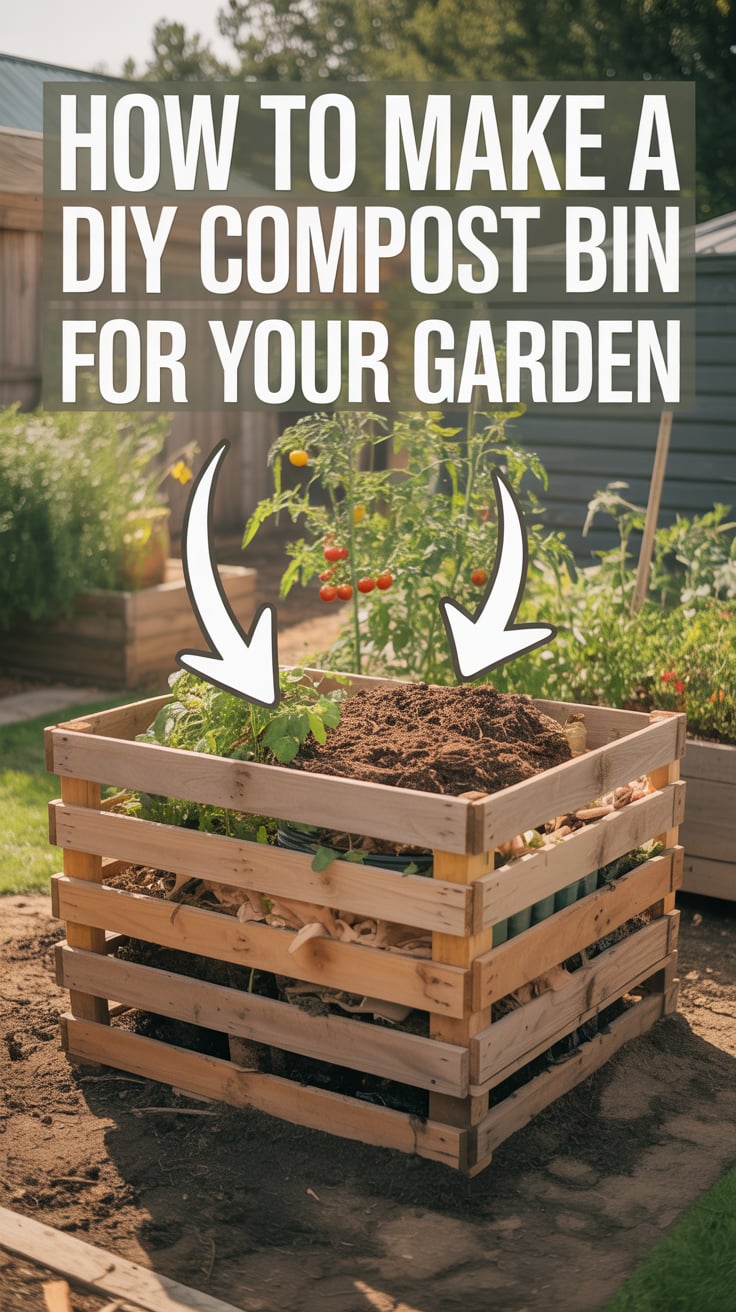
Option C: Pallet corner bin (free and fast, larger capacity)
- 3 pallets of roughly the same size (untreated wood preferred)
- Rope, cord, or heavy zip ties to lash corners
- Optional: a fourth pallet or burlap sack to serve as a front or lid
Basic tools you may already have
- Drill and bits (or a hammer and nail for pilot holes)
- Utility knife or scissors
- Safety gloves and glasses
- Bucket or watering can
What you’ll compost in the bin
- Browns (carbon-rich, dry): dried leaves, shredded cardboard, paper, straw, wood shavings, sawdust from untreated wood
- Greens (nitrogen-rich, moist): fruit and vegetable scraps, coffee grounds, tea leaves, fresh grass clippings, green prunings
- Moisture: rainwater or stored water; aim for damp-sponge feel, not soggy
Sourcing tip: If a tote or buckets are your base, your total cash outlay may be $0–$10 depending on what you have on hand. The wire cylinder can also be under $10 if you find discounted mesh or use repurposed fencing.
Step-by-step build: how to make a $10 DIY compost bin
Choose one of the following builds and follow the steps. Each takes about 15–45 minutes.
Build A: The lidded tote bin
- Prepare airflow: Drill 10–15 holes in the lid, 10–15 near the top edge of the sides, and 10–15 in the base for drainage. Hole size about 1/4 inch.
- Elevate: Place the tote on bricks or scrap wood so the base holes can drain and air can circulate.
- Optional lining: If you worry about gnats, tape small pieces of mesh or screen over interior side holes.
- Start with browns: Add a 3–4 inch base layer of shredded cardboard or dried leaves to absorb moisture.
- Layer materials: Add a thin greens layer (kitchen scraps), cover with browns. Repeat. Always cap fresh scraps with browns to deter pests and smells.
- Secure lid: Keep the lid on to maintain warmth and keep out pests; crack it slightly in very wet weather to increase airflow.
Build B: The wire cylinder bin
- Form the cylinder: Cut mesh to length so you get roughly a 2–3 foot diameter circle. Overlap ends by one square of mesh and secure with zip ties every 4–6 inches.
- Anchor: Set the cylinder directly on soil. Use a couple of stakes or tent pegs if it’s breezy.
- Line the sides: If your mesh is wide, tuck cardboard or burlap inside the lower third to prevent small scraps from spilling while still allowing airflow.
- Start the pile: Add a fluffy 4-inch browns base. Layer greens and browns, ending with browns.
- Cover: Use a piece of cardboard or burlap on top to hold in moisture while venting excess humidity.
Build C: The pallet corner bin
- Site selection: Find a level corner of your yard with afternoon shade. Set two pallets at right angles, then the third to complete a U-shape.
- Lash corners: Use cord or heavy zip ties to join the pallets at the corners. It doesn’t need to be airtight—gaps provide airflow.
- Ground prep: Loosen the soil or lay down twigs for drainage.
- Build the pile: Add browns base, then layer greens and browns. Use a fourth pallet or burlap as a removable front if you want a neater look.
- Manage rain: Place a loose cover of cardboard or a tarp in heavy rains to prevent waterlogging.
Safety and durability notes
- Avoid treated lumber for any bin parts that contact compost.
- Keep holes modest in the tote so you retain heat and moisture.
- Elevation prevents soggy bottoms and deters ants.
- Lids/covers reduce critter interest and keep a tidy appearance.
Setting up your bin for fast breakdown
Speed and success depend on air, moisture, and a workable carbon-to-nitrogen balance. Think simple rules, not science class.
Aim for a 2:1 or 3:1 ratio by volume (browns to greens)
- A handful of fruit peels needs a handful or two of shredded cardboard or leaves on top.
- Grass clippings count as greens even when dry on the surface; balanced by more browns.
Chop or shred for speed
- Cut scraps to 1–2 inch pieces.
- Shred cardboard; crumble leaves by hand.
- Smaller particles decompose faster and turn easier.
Moisture matters
- Goal: like a wrung-out sponge—moist, not dripping.
- Too dry? Add water and more greens, then cover with browns to hold moisture.
- Too wet? Add dry browns, increase airflow, and fluff the pile.
Airflow without a tumbler
- Fluff weekly with a garden fork, hand cultivator, or a sturdy stick.
- In tote bins, gently mix from the sides, keeping base holes clear.
- In wire or pallet bins, open the top, plunge the tool to the bottom, and lift to introduce oxygen.
Location and temperature
- Light shade keeps moisture up and stops overheating in summer.
- Winter composting still works; it just slows. Insulate with extra browns on top.
Odor control and pest proofing
- Always cap fresh food scraps with 1–2 inches of browns.
- Avoid meats, dairy, and oily foods. These attract pests and smell.
- A fitted lid or burlap/cardboard cap discourages flies and critters.
- If you notice gnats, add more dry browns and keep the top layer thick.
Water-wise setup
- Keep a small bucket and scoop near the bin to add water as you build layers.
- Collect rain in clean containers and store in the shade to top up compost moisture.
- If municipal restrictions or droughts are common, having a backup store of water makes your compost dependable. A simple, compact water storage system like SmartWaterBox can provide a steady reserve for garden and compost use.
Daily and weekly care for odor-free, efficient compost
Think of your bin like a slow cooker with an occasional stir—minimal work, reliable results.
Your weekly rhythm
- Feed: Add greens from the kitchen 2–4 times per week in small batches. Each time, cover with browns.
- Fluff: Once a week, introduce air. In small tote bins, loosen the bottom layer so leachate drains and odors don’t form.
- Moisture check: Squeeze a handful. If it crumbles, add water or wetter greens; if it drips, add browns.
- Cap it: Always finish with a dry, carbon-rich cover layer to control fruit flies and smells.
Speed boosters
- Balance layers, keep oxygen flowing, and chop scraps smaller.
- Coffee grounds and tea add nitrogen and heat without attracting pests.
- Fresh grass clippings (mixed with browns) jump-start microbial activity.
- Building one bigger hot pile is faster than several tiny ones, but even a small tote bin will steadily produce compost with good habits.
Time to finished compost
- With weekly fluffing, balanced inputs, and proper moisture:
- Warm-season, small bin: 6–12 weeks
- Cool-season, small bin: 12–20+ weeks
- A two-bin system accelerates results: one bin “active,” one bin “finishing.” When the active bin fills, stop feeding it and begin filling the second. The first will mature undisturbed.
If your bin is in a courtyard or patio
- Keep a countertop caddy with a tight lid and empty it often.
- Cover each deposit thoroughly—no visible food on top.
- Line the base of tote bins with corrugated cardboard or wood chips for better airflow.
Clean and simple leachate management
- Tote bins with base holes may shed a little liquid. Elevate on bricks and place a small tray underneath if on hard surfaces.
- If you collect leachate, dilute heavily before using on ornamental plants; do not use on edible leaves or root crops.
Troubleshooting common compost bin problems
Most issues trace back to one of three things: too wet, too dry, or fresh greens exposed. Use this quick guide to fix problems fast.
It smells sour or like ammonia
- Cause: Too many greens and not enough air.
- Fix: Add a thick layer of browns (shredded cardboard, leaves). Fluff deeply to introduce oxygen. Check that base holes are clear and the bin is elevated.
There are fruit flies or gnats
- Cause: Exposed kitchen scraps on top.
- Fix: Bury new scraps in the middle and cap with 1–2 inches of dry browns. Add a piece of cardboard or burlap as a breathable lid.
It’s not breaking down
- Cause: Dry pile or not enough nitrogen.
- Fix: Add water until it’s like a wrung sponge, then add greens (coffee grounds work well) and fluff. Chop new inputs smaller.
It’s soggy or slimy
- Cause: Too wet and compacted.
- Fix: Add bulky browns like torn egg cartons, straw, or twigs to create air pockets. Fluff and leave the lid slightly ajar in dry weather to vent moisture.
Ants moved in
- Cause: Pile too dry, sweet scraps attracting them.
- Fix: Add water and moist greens, then mix. Keep moisture balanced and cover well with browns.
Rodents are investigating
- Cause: Strong food scents or accessible openings.
- Fix: Do not add meat, dairy, oil, or cooked foods. Maintain a solid lid or tight burlap cap. In wire bins, line the bottom 6 inches with smaller mesh if needed. Bury food scraps deeper.
The bin seems too small
- Cause: Small volume can’t heat up as easily.
- Fix: Combine two small bins into one larger pile when possible, or accept a slower, steady cold-compost pace. Your results will still be good.
Winter slowdown
- Cause: Cold temperatures reduce microbial activity.
- Fix: Keep feeding, add extra browns on top, and fluff less often. Consider insulating sides with cardboard. Compost continues; it’s just slower.
In drought conditions
- Cause: Lack of water stalls decomposition.
- Fix: Schedule a regular moisture check. Storing clean water for compost and garden use with a simple reserve like SmartWaterBox helps maintain the ideal dampness without straining household use. Off-grid or backup water ideas from Joseph’s Well can also inspire simple, resilient setups.
Using finished compost and scaling your system
Recognizing finished compost
- Appearance: Dark, crumbly, soil-like
- Smell: Earthy, not sour
- Texture: Few recognizable pieces; small twigs or eggshell bits are fine
How to use it in your garden
- Soil amendment: Mix 1–2 inches into the top 6 inches of existing soil before planting.
- Top dressing: Spread 1/2–1 inch around perennials, shrubs, and trees, keeping away from trunks.
- Mulch boost: Sprinkle a thin layer under straw or wood chip mulch to inoculate soil life.
- Potting mix addition: Blend up to 25% mature, screened compost with coco coir or peat and perlite for container plants.
- Compost tea or extract: Steep a handful in water for 24 hours, agitate occasionally, and apply to soil (avoid foliar application on edibles unless you’re familiar with safe brewing practices).
Screening and storage
- Use a simple DIY screen (hardware cloth over a frame) to sift out larger bits. Return chunky leftovers to the active bin.
- Store finished compost under cover to protect nutrients from leaching in heavy rains.
Scaling up when you fall in love with the results
- Add a second bin: One active, one finishing keeps compost moving.
- Build a larger pallet bay: Still nearly free, with easier turning and aeration.
- Try a wire “leaf corral”: Perfect for fall leaves, which become spring planting gold.
- Improve airflow: Add vertical perforated pipes or woody sticks to larger piles.
- Consider a simple leachate catcher if on hard surfaces, or site on soil for best drainage and soil life exchange.
Integrating with your whole garden system
- Keep a mulch pile adjacent to the bin for ready browns.
- Plant a comfrey or nettle patch; cut-and-drop leaves are nutrient-rich greens for the pile.
- Pair composting with water-wise habits. If you’re designing a resilient setup, off-grid water ideas from Joseph’s Well can help you think beyond the hose and tap.
Helpful extras for water-wise composting and resilience
Composting thrives with consistent moisture and a steady flow of organic matter. These simple add-ons help your $10 bin perform like a pro.
Easy sources of browns
- Cardboard and paper: Remove glossy coatings and tape; shred to increase surface area.
- Fall leaves: Bag and store dry; they’re your year-round carbon bank.
- Straw and wood shavings: Great structure and absorption (avoid black walnut debris near vegetables).
Kitchen workflow that reduces waste
- Keep a small lidded caddy by the sink; empty it frequently to deter fruit flies.
- Layer a handful of browns in the caddy to absorb liquid and reduce odor.
- If you’re exploring broader food resilience, learning heritage preservation can reduce how much ends up in the bin. A general resource like The Lost SuperFoods focuses on long-lasting pantry strategies, which complements composting by minimizing avoidable waste.
Water storage and off-grid options
- Even in small spaces, a couple of lidded containers dedicated to rain or graywater (sink rinse water safe for soil) keep compost active through dry spells.
- Compact storage solutions such as SmartWaterBox can make it easy to reserve clean water for compost and beds without heavy infrastructure.
- For broader resilience or water independence inspiration, Joseph’s Well shares off-grid water concepts that can inform simple, practical garden setups.
Design upgrades that still cost almost nothing
- Removable top: A scrap of corrugated plastic or plywood to keep heavy rain out.
- Aeration core: A length of perforated pipe set vertically in the center of larger piles.
- Multi-bin rotation: Label bins “Feed,” “Rest,” and “Use” to maintain a continual harvest.
- Shade cloth or burlap wrap in summer: Prevents rapid drying, crucial for hot, windy zones.
Keep it simple and consistent. The best compost system is the one you tend for a few minutes each week, not the fanciest bin on the block.
Conclusion: how to make a $10 DIY compost bin and keep it thriving
You now know how to make a $10 DIY compost bin for your garden with repurposed totes, mesh cylinders, or free pallet corners. The keys are simple: keep your browns-to-greens ratio in balance, maintain sponge-like moisture, introduce air weekly, and always cap fresh scraps with dry material. With those habits, your budget bin will quietly turn kitchen and yard waste into a steady stream of dark, crumbly compost that boosts soil health and garden yields. Start with what you have, upgrade only if you need to, and enjoy homegrown compost that costs next to nothing.
FAQ: how to make a $10 DIY compost bin
What’s the cheapest compost bin design I can build?
A wire cylinder made from repurposed garden mesh or fencing is often the cheapest. A lidded tote from a reuse source is also commonly under $10, especially if you already own a drill.
How do I keep a $10 DIY compost bin from smelling?
Balance greens with at least twice as many browns by volume, keep moisture like a wrung-out sponge, fluff weekly, and always cover fresh scraps with 1–2 inches of dry material.
Can I compost in winter with a small bin?
Yes. Decomposition slows but continues. Add extra browns on top for insulation and maintain moisture. Expect longer finishing times until temperatures rise.
What should I avoid putting in a low-cost compost bin?
Skip meats, dairy, oily foods, large amounts of cooked foods, pet waste, and diseased plants. These can cause odors, attract pests, or spread pathogens.
How long until I can use the compost from a $10 bin?
In warm weather with good balance and airflow, you can get finished compost in 6–12 weeks. Cooler weather or low-input systems may take longer, but steady care yields dependable results.